

The slide editor
The slide editor is where you configure a SlideMind slide: what the learner sees, what the AI does, what comes back, and how to install it in your course. This page explains its layout, its menus, and how saving and publishing work.
Layout
Section titled “Layout”The editor reads like a document, one step after the other.
- Header: the breadcrumbs, the slide title, the status menu, Save slide and the Actions menu (the ⋯ button). Next to the title, the save state reads Saved with a check mark, Unsaved changes with a dot, Saving…, or Save failed. Save slide stays inactive while everything is saved, and becomes available as soon as you change something.
- Left: the Activity box and the outline of the steps. Select a step to jump to it.
- Center: the steps. Each one opens with a question, such as “How should the AI respond?”, followed by its main field. Secondary fields open on demand with buttons such as Example answer or Adjust.
- Right: the Try it panel, where you test the slide. It starts collapsed as a narrow Try it bar: select it to open the panel. Your browser remembers whether you keep it open.
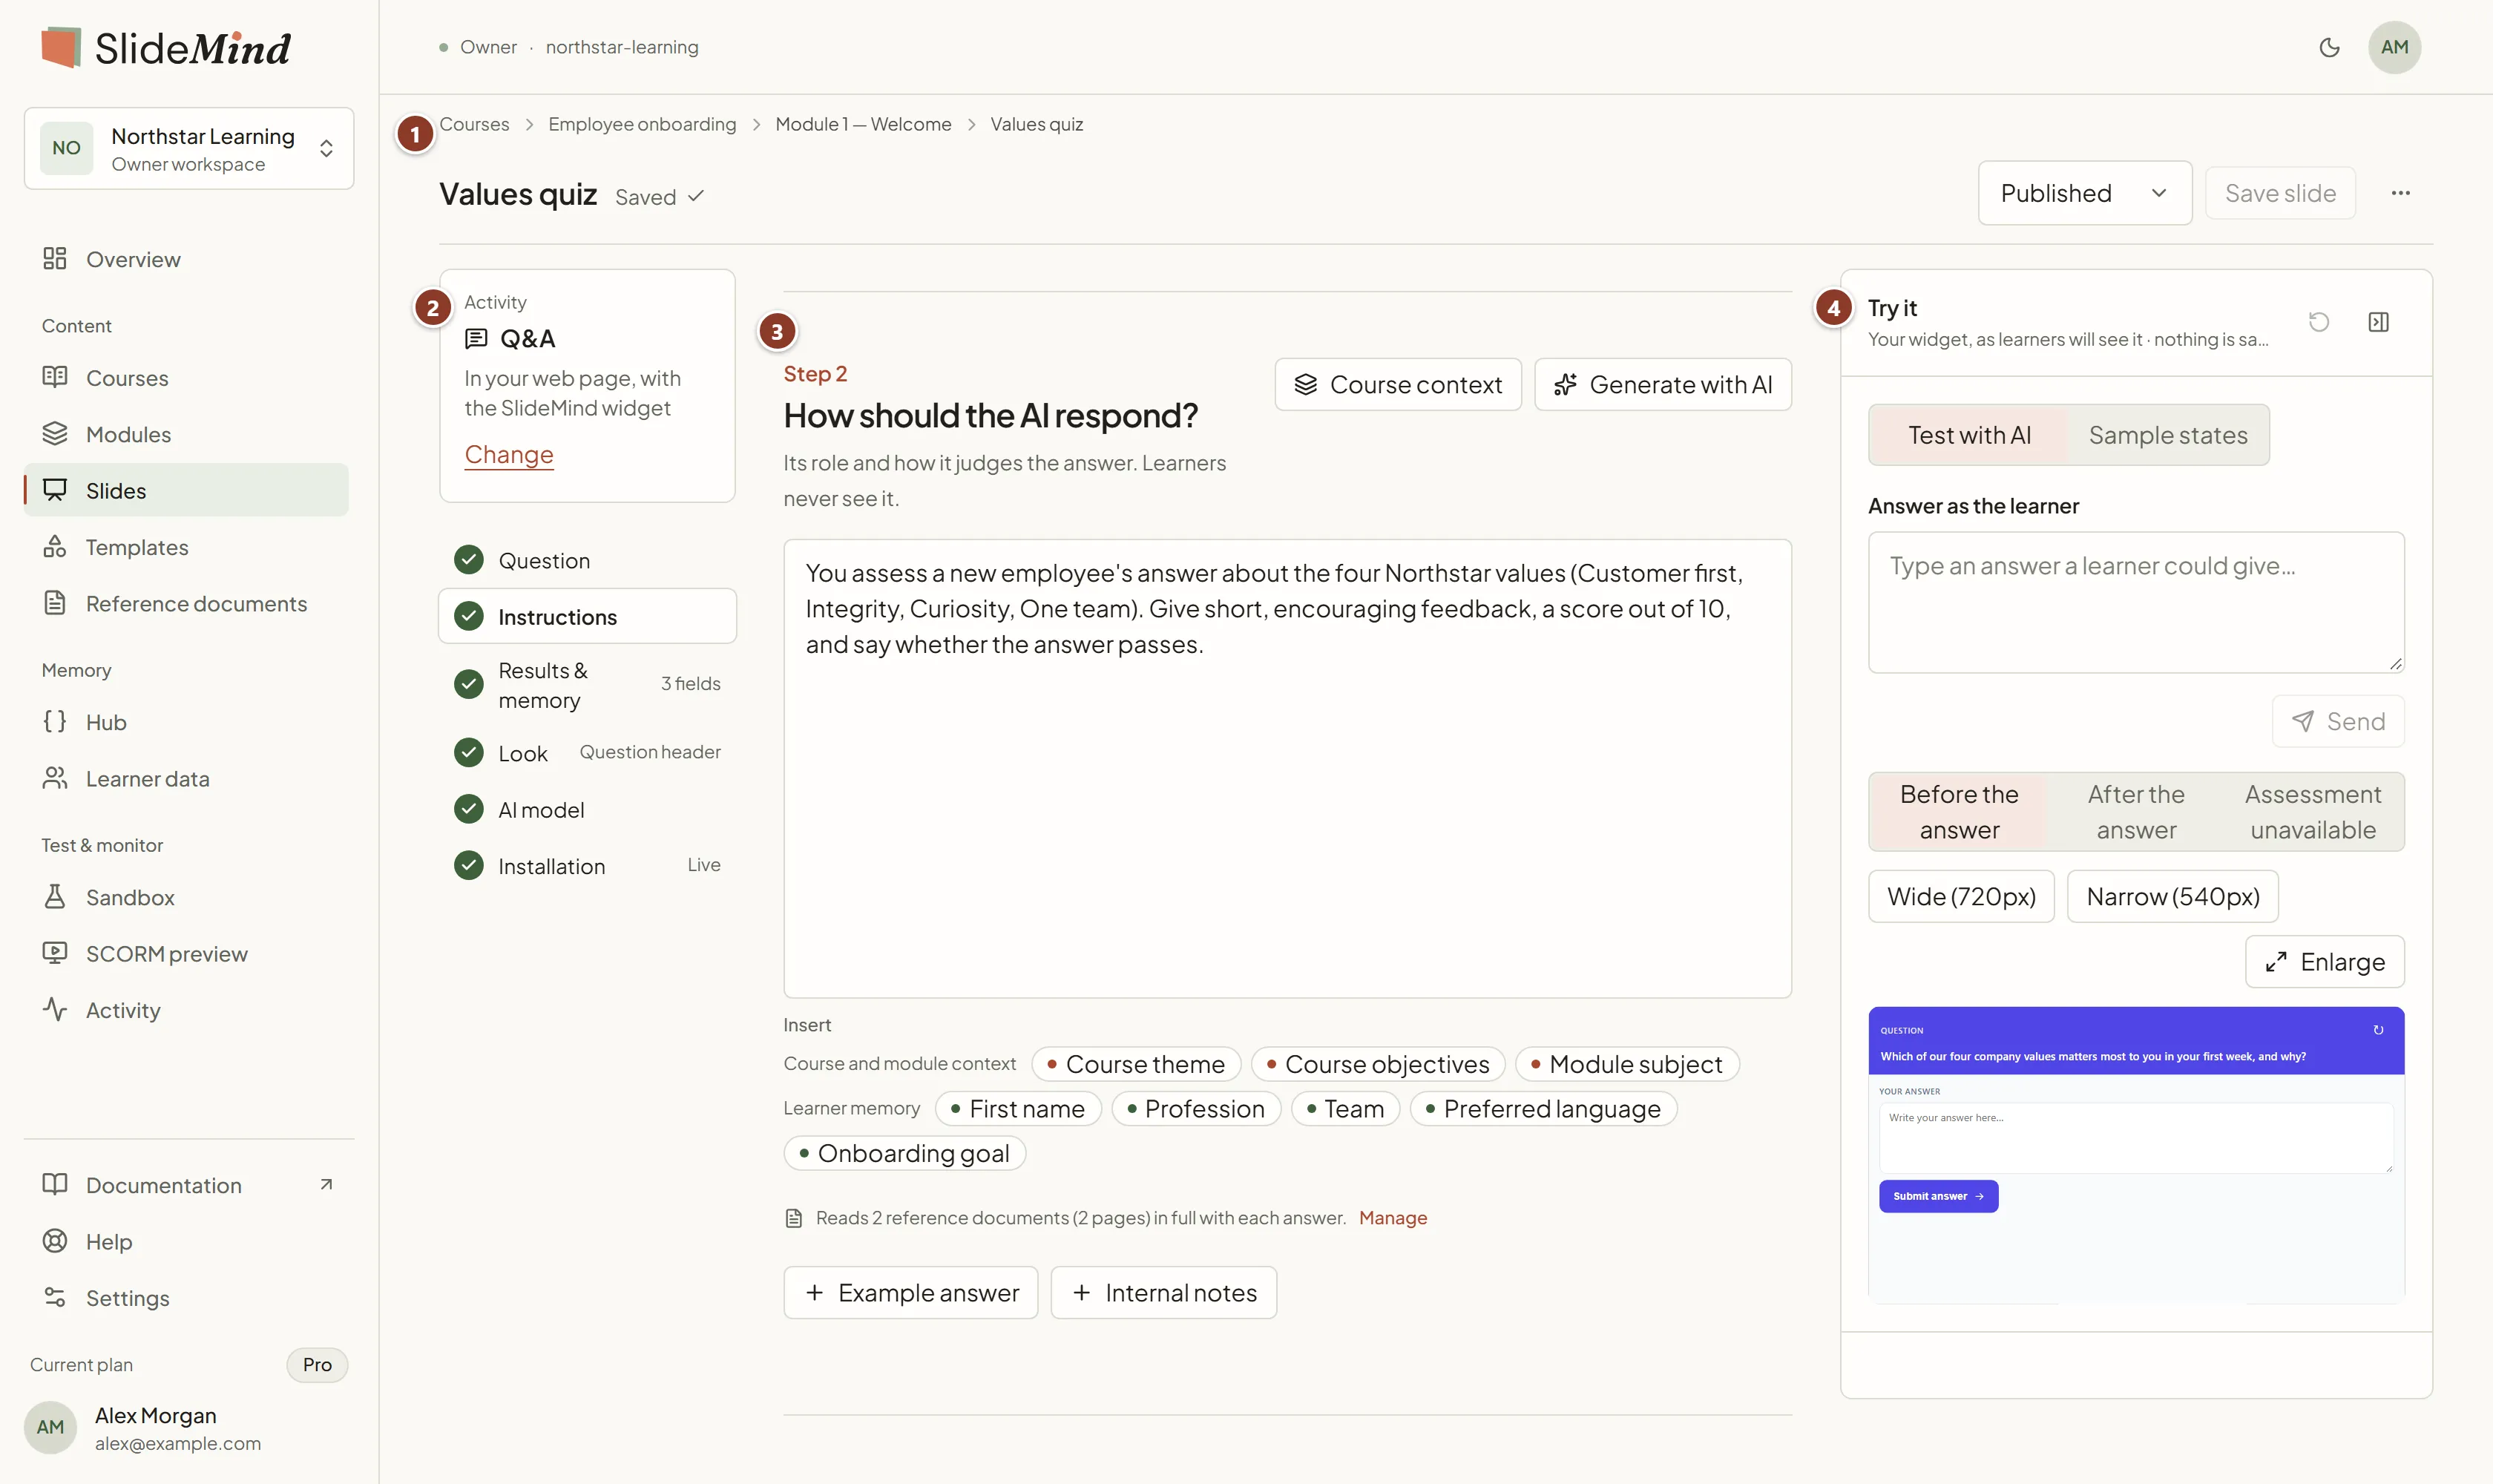
On smaller screens, the steps appear as a row under the header. On narrower screens still, a Try it button in the header opens the panel on the side.
Step states
Section titled “Step states”An icon before each step of the outline shows its state. Screen readers announce the state in words.
| State | Icon | Meaning |
|---|---|---|
| Done | Check mark in a green circle | The step is filled in, or its default is fine. |
| To do | Colored circle | The step needs your input, such as the instructions of a new slide. |
| Optional | Dashed circle | You can skip it, like the question of a Q&A slide. |
| Not used with this interface | Dashed circle with a dash, step grayed out | The step doesn’t apply to the chosen interface. You can’t open it. |
Under Instructions for the AI, a line says which reference documents the slide reads, with Manage or Add one. See Reference documents.
A short summary sits next to some steps, such as the number of structured fields, the number of turns of a Chat, or Live for the Installation step of a published slide.
The steps
Section titled “The steps”The steps you see depend on the activity and the interface. See Activity types for the list per combination.
| Step | Question it answers | Learn more |
|---|---|---|
| Question | What does the learner see? | Write the AI instructions |
| Instructions | How should the AI respond? (Q&A) / What should the AI do? (Chat) | Write the AI instructions |
| Conversation | How does the conversation go? | Conversations (Chat) |
| Values to remember | What should SlideMind remember? | Saving values |
| Results & memory | What comes back? | Results: plain text or structured, Saving values |
| Look | How does it look? | Appearance and language, Q&A layouts |
| AI model | Which AI answers? | Models and response settings |
| Installation | Set it up in, or add it to, your destination | Integration overview |
The Activity box
Section titled “The Activity box”The Activity box sums up the activity and where it runs, for example “In Storyline, with the SlideMind widget”. Select Change to open the Activity and destination dialog. See Change the activity or interface.
The Actions menu
Section titled “The Actions menu”Open the Actions menu with the ⋯ button in the header:
- Slide details: the Title, the Course and the Module the slide is attached to, and its Slide number. “Changes are saved with the slide”: select Save slide afterward. When you change the attachment, a note reminds you to save the slide to refresh the inherited content.
- History: earlier versions of the slide, which you can restore. See Version history.
- Duplicate: a draft copy with its own integration code. See Create a slide.
- Delete slide: removes the slide for good. See Create a slide.
Slide number and variable names
Section titled “Slide number and variable names”The Slide number and the title are used to name the variables of the authoring tool integration code. For a slide titled “Values quiz” with the number 2, the generated names look like this:
userMsg_s2_valuesQuizaiResp_s2_valuesQuizGive each slide of a course its own number, so that two slides don’t end up with the same variable names. If you change the title or the number after installing the code, read Changing a slide after installation.
Save and publish
Section titled “Save and publish”A slide has one of three statuses. Pick it in the status menu of the header, then select Save slide.
| Status | What learners get |
|---|---|
| Draft | No answer. New slides start as drafts. |
| Published | Answers from the integration code installed in your course. |
| Archived | No answer. Use it for slides you keep for reference. |
While a slide isn’t published, the Installation step shows “This slide is not published yet”, with a Publish button, or Save and publish when you have unsaved changes. A SlideMind widget for a slide that isn’t published shows “Configuration not found.”
Only the slide’s status counts: the status of its course or module doesn’t change what learners get. See Courses and modules.
Errors and unsaved changes
Section titled “Errors and unsaved changes”- Invalid settings: the editor shows “Some settings are invalid. Review the indicated fields before saving.” with one button per field to fix. Select a button to jump to the field. Save slide stays unavailable until every field is valid. A slide also needs a title: if it’s empty, a Slide details button takes you to it.
- Unsaved changes: if you leave the slide before saving, a dialog asks “Leave with unsaved changes?”. Select Discard changes and leave to lose your changes, or cancel to keep editing. Your browser also warns you if you close the tab.
Test with Try it
Section titled “Test with Try it”Try it sends a real test to the AI with the settings on the page, including the ones you haven’t saved. Each test is a real AI call, billed like a learner’s. For a Q&A slide with the SlideMind widget, Try it also offers free Sample states that show the widget without calling the AI. A Capture slide only simulates what would be saved. See Try it.
A read-only slide
Section titled “A read-only slide”When the owner’s account has returned to Discovery, a slide beyond its limits opens read-only, with a Read-only badge next to its title and a line such as “This slide is above Discovery’s limits. It keeps answering learners until ….” Its fields are greyed, and it has no Save slide and no Try it, but you can Export it or delete it. See Back on Discovery: read-only above the limits.
If you are a Viewer
Section titled “If you are a Viewer”Viewers can open every slide and read its settings, but the fields are locked. They don’t see Save slide or Change, their Actions menu only offers Slide details and History, and on a Q&A or Chat slide Try it tells them: “Viewers can read this slide but not test it.” See Members and roles.