

Members and roles
A workspace can have several members, each with a role that decides what they can do in it. This page is for workspace owners who invite collaborators, and for editors and viewers who want to know what their role allows.
Roles apply inside one workspace only. If you belong to several workspaces, you can be the owner of one and a viewer in another. See Several workspaces.
The three roles
Section titled “The three roles”| Role | Who it’s for |
|---|---|
| Owner | The person who created the workspace, or who took it over by a transfer. There is one owner per workspace. The owner connects the AI, manages members, data and settings, and can delete the workspace. |
| Editor | Course authors and instructional designers. Editors build and test slides, courses, modules and templates. They can read the settings but not change them. |
| Viewer | Reviewers and stakeholders. Viewers can read content and copy integration code, but can’t change or test anything. |
You can’t invite someone as Owner, and the owner can’t be removed or given another role. To change the owner, the owner transfers the workspace to another account, a member’s or anyone else’s. See Transfer ownership of a workspace.
What each role can do
Section titled “What each role can do”| Action | Owner | Editor | Viewer |
|---|---|---|---|
| Open the Overview and browse courses, modules, slides and templates | ✓ | ✓ | ✓ |
| Copy a slide’s integration code | ✓ | ✓ | ✓ |
| Create, edit, publish, duplicate and delete courses, modules, slides and templates | ✓ | ✓ | — |
| Restore an earlier version, export and import content items | ✓ | ✓ | — |
| Test slides in Try it and the Sandbox | ✓ | ✓ | — |
| Open Activity (requests and errors) | ✓ | ✓ | ✓ |
| See consumption (credits used, estimated costs) on the Overview and in Activity | ✓ | ✓ | — |
| Open Activity › Security (record of sensitive changes) | ✓ | — | — |
| Open Settings | ✓ | Read only | — |
| Change settings: AI mode, provider keys and course keys, defaults for new slides, allowed websites, retention | ✓ | — | — |
| View the Memory Hub | ✓ | ✓ | — |
| Add, edit or delete Memory Hub variables | ✓ | — | — |
| See the Learner data list | ✓ | ✓ | — |
| Open, edit, export or purge a learner’s stored values | ✓ | — | — |
| Export or import the whole workspace | ✓ | — | — |
| Invite members, change roles, remove members, manage invitations | ✓ | — | — |
| Transfer ownership of the workspace | ✓ | — | — |
| Delete or restore the workspace | ✓ | — | — |
In many places, SlideMind tells you when your role doesn’t allow an action. For example, the Try it panel says “Viewers can read this slide but not test it.”
Some features also depend on the plan, whatever your role: custom templates, Generate with AI, your own API keys, course-specific keys and analytics. See Plans.
Invite a member
Section titled “Invite a member”Only the owner can invite people.
- Go to Settings › Access. You can also click Invite member at the bottom of the Overview.
- In Invite by email, enter the person’s e-mail address, for example
colleague@example.com. - In Role, choose Editor or Viewer.
- Click Invite.
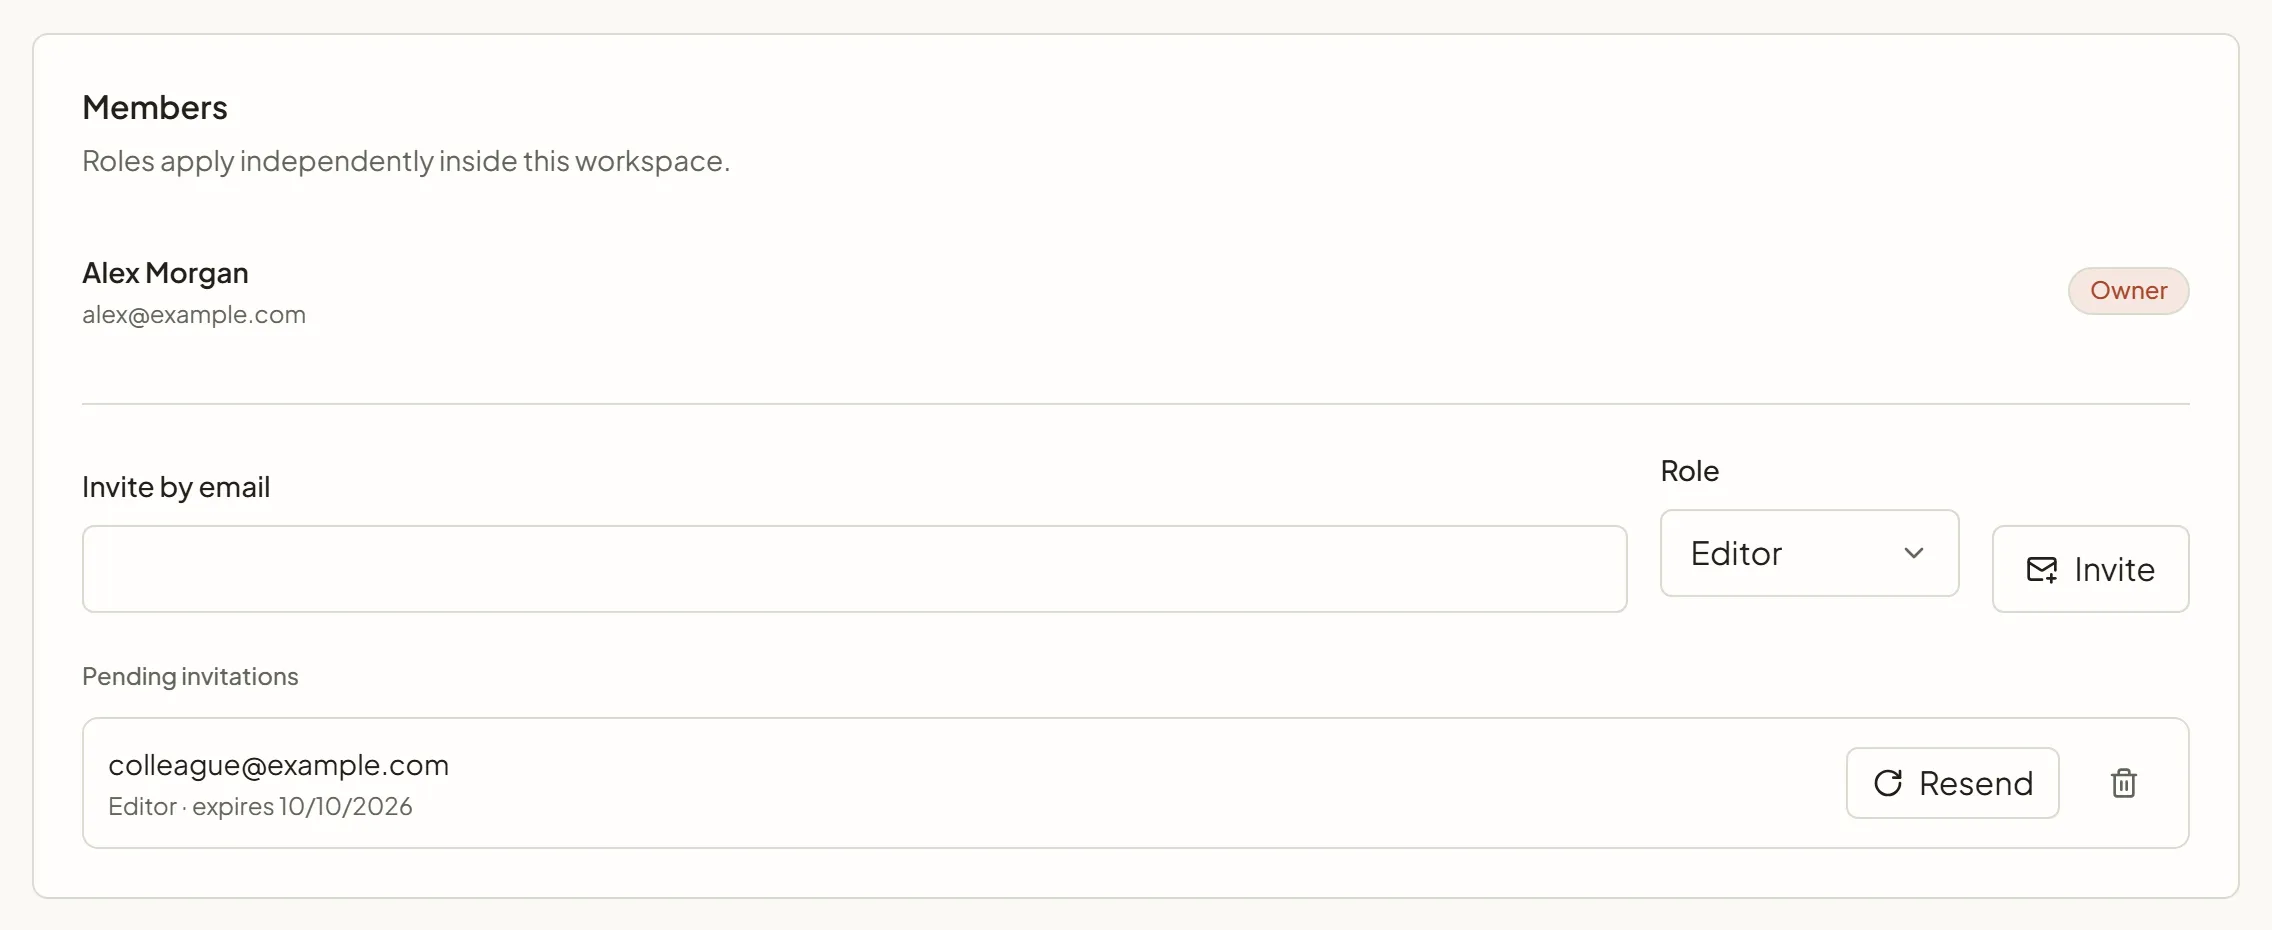
SlideMind sends an e-mail with an Accept invitation link, and the invitation appears under Pending invitations. The invitation is recorded in Activity › Security.
The badge at the top of the Members list shows the seats this workspace uses, out of the plan’s maximum when there is one. Members and pending invitations both count: canceling an invitation frees its seat.
What the invited person sees
Section titled “What the invited person sees”The link in the e-mail opens an invitation page. It shows the workspace, who sent the invitation, the role, and when the invitation expires.
- If they’re already signed in, they click Accept invitation and the workspace opens.
- If they aren’t, they choose I already have an account — sign in or Create an account to accept, then accept.
The invitation works only for the address it was sent to. If the person is signed in with another address, the page asks them to sign in with the invited one. Someone who creates an account to accept accepts the Terms of Service on the sign-up form. The invitation e-mail is in the language of the invited person’s account, or the inviter’s when they have none.
The invitation can’t be accepted for a while in two cases, and the page says so:
- “This workspace has no free seat right now. Ask its owner to free one or to choose a plan with more seats, then open this link again.” This happens when the owner’s account has returned to Discovery. See Back on Discovery: read-only above the limits.
- “This workspace’s subscription is paused. You can accept the invitation once it resumes.”
Manage pending invitations
Section titled “Manage pending invitations”Each invitation under Pending invitations shows the role and its expiry date.
- To send the e-mail again, for example if the person can’t find it, click Resend.
- To cancel an invitation, click the trash icon next to it, then Cancel invite. The link stops working.
An expired invitation can’t be accepted: the person sees “This invitation has expired. Ask the workspace owner to send a new one.” To send a new one, cancel the old invitation, then invite the address again.
Change a member’s role
Section titled “Change a member’s role”In Settings › Access, use the role menu next to the member to switch between Editor and Viewer. The change applies at once and is recorded in Activity › Security.
You can’t change your own role or the owner’s.
Remove a member
Section titled “Remove a member”- In Settings › Access, open the actions menu (…) next to the member.
- Choose Remove …, followed by the member’s e-mail address.
- Confirm with Remove member.
The person immediately loses access to the workspace. Their account and the other workspaces they belong to aren’t affected. The content they created stays in the workspace.
The same actions menu has Transfer ownership to …, which hands the workspace over to that member. See Transfer ownership of a workspace.
Next steps
Section titled “Next steps”- Workspace settings: what owners and editors find in each settings tab.
- Several workspaces: switch between workspaces and keep teams or clients apart.
- Transfer ownership of a workspace: hand a workspace over to a client or a colleague.
- Learner data: what owners can do with a learner’s stored values.
- Activity and analytics: follow requests, errors and sensitive changes.