

Memory Hub
The Memory Hub is the catalog of the learner memory variables of your workspace. It also lists the stored keys that are not defined yet, and it generates JavaScript that saves values to memory or loads them back into your authoring tool. This page is for workspace owners and course authors.
Open it from the sidebar: Memory › Hub. Owners and Editors can open the Memory Hub; Viewers cannot.
Why define a variable
Section titled “Why define a variable”A slide can save any key without defining it first. Such a key, sometimes called an ad hoc key, works in prompts like any other. Defining a variable in the Memory Hub adds these benefits:
- it appears in the Learner memory group of the variable picker when you write instructions;
- its description tells your team what the value holds and which slide captures it;
- only defined variables can be used by the Memory Hub code to save or load values.
Define a memory variable
Section titled “Define a memory variable”Only the workspace owner can change memory definitions.
-
Click New variable.
-
Fill in the New memory variable dialog:
Field What it does Example Name The name you see in SlideMind, on pills, chips and lists. Accents and spaces are fine; {,}and|are not. Each name can be used by one variable only.Learner first name Variable Not a field: SlideMind creates it from the name, for example memory.learner_first_name. It’s the placeholder used in prompts and the key under which values are stored. It no longer changes once the variable is added.memory.learner_first_nameScope Where the value is meant to live: global, course, module or slide. global Description (optional) What the value holds and where it comes from. Learner first name, captured on the intro slide -
Click Add variable.
Renaming a variable later changes only its Name. The Variable stays as it was created, “so prompts and stored values keep working.” The name also shows next to the key in Try it, the Sandbox and learner data.
The catalog
Section titled “The catalog”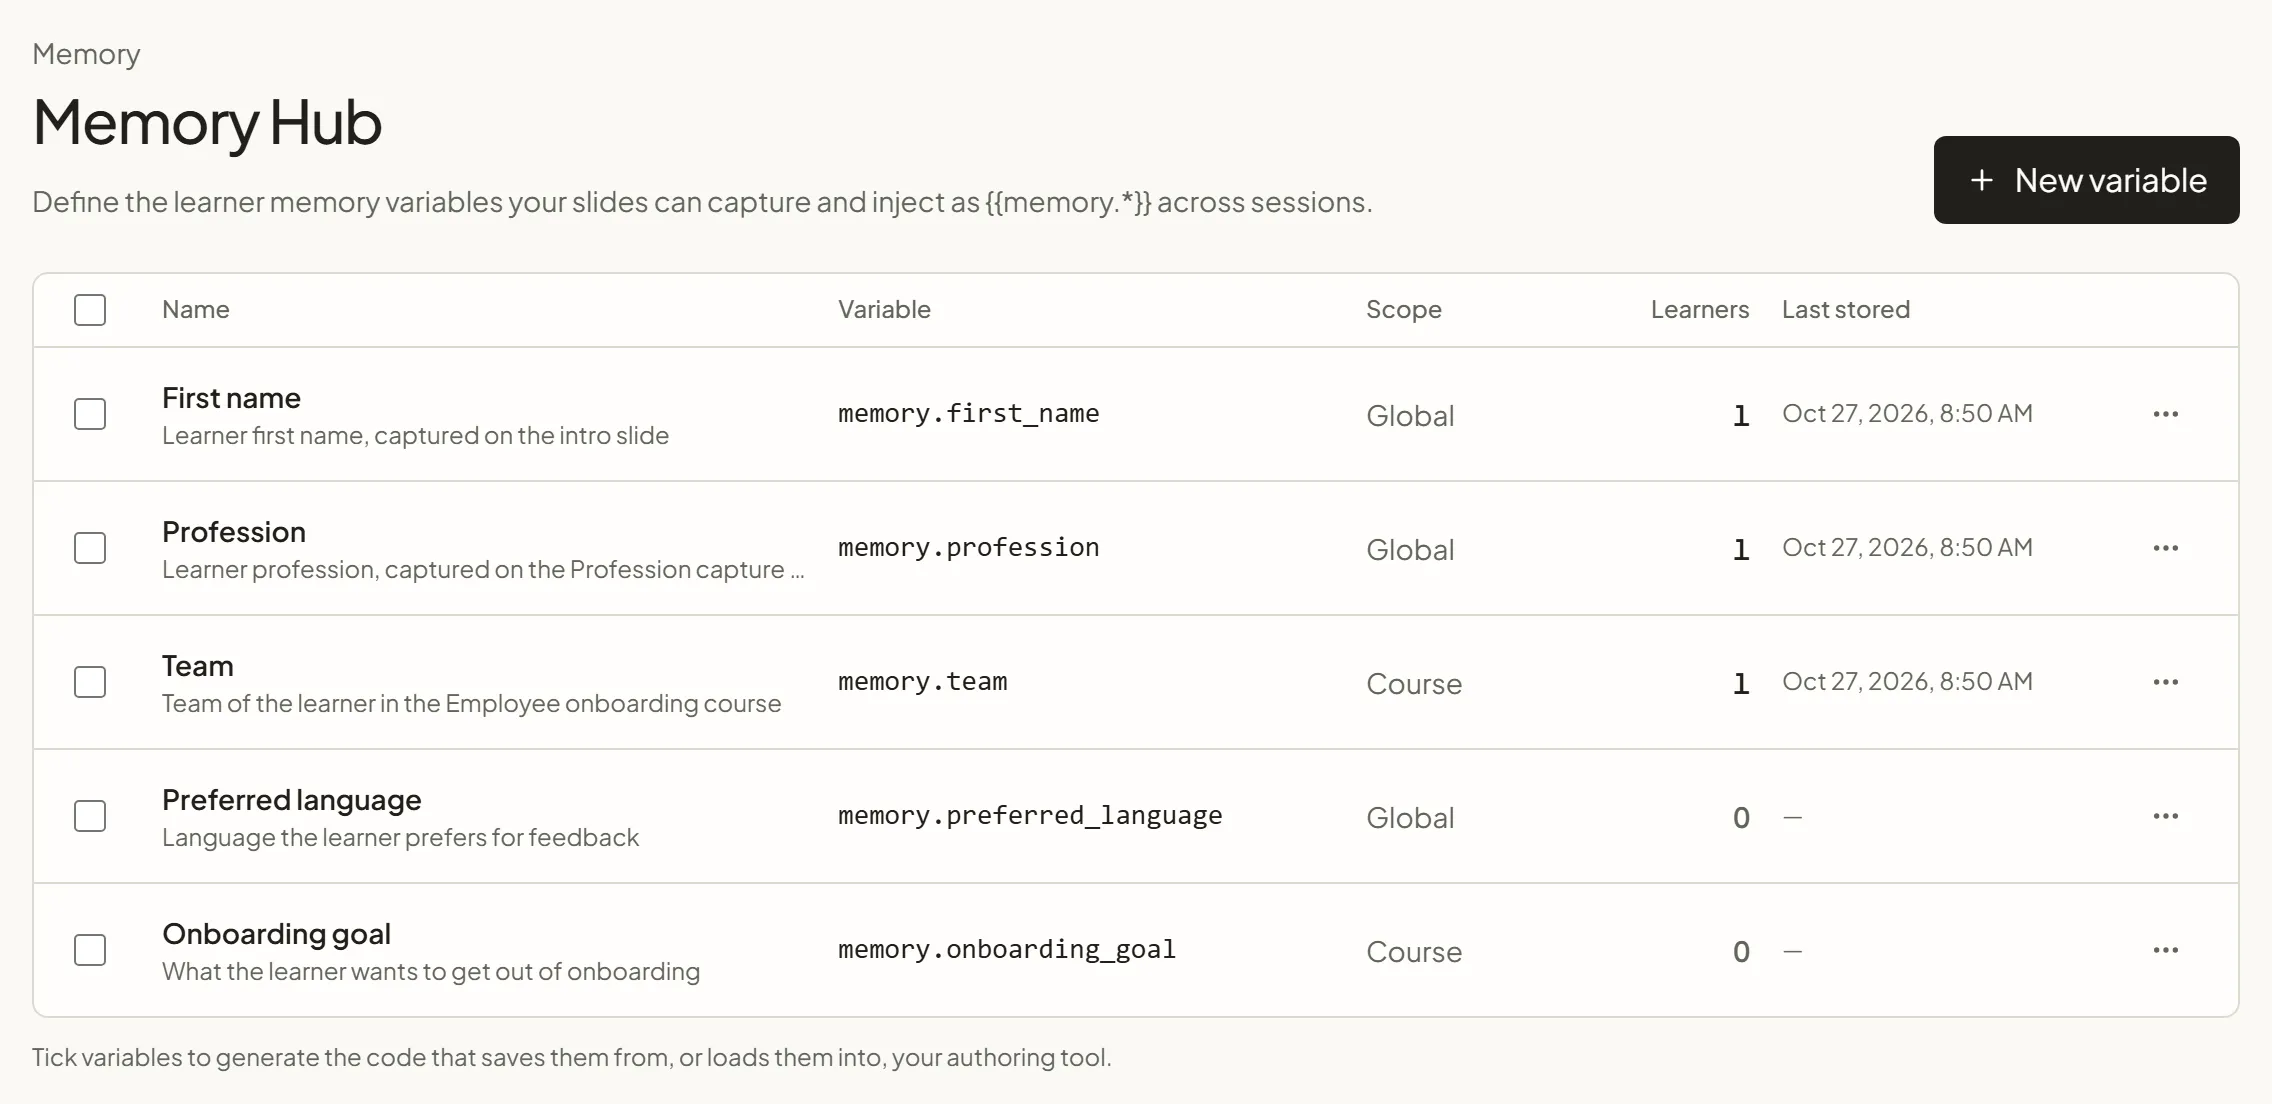
The catalog lists each variable in these columns:
| Column | What it shows |
|---|---|
| Name | The readable name, with the description below it. |
| Variable | The key, as used in prompts: memory.first_name. |
| Scope | The scope chosen in the definition. |
| Learners | How many learners have a stored value for this name at this scope. |
| Last stored | The date and time a value was last saved for this variable. |
To change or remove a variable, the owner opens its ⋯ menu and chooses Edit or Delete. In the Edit memory variable dialog, Save changes stays inactive until you change something. Deleting removes the variable from the catalog only: “Values already stored for learners are not deleted.”
Keys found in memory, not in the Hub
Section titled “Keys found in memory, not in the Hub”Below the catalog, the Keys found in memory, not in the Hub list shows the keys that hold learner values but match no catalog variable: “Captured by a slide but not defined here.” The list appears only when there is at least one such key. For each key, you see:
- its name and where it is stored: Global, or the name of the course, module or slide, followed by its scope;
- the number of learners with a value;
- the date of the last activity.
Keys saved by exchange memory, such as conversation_rolePlayA, usually appear here. A key defined in the catalog at another scope also appears here, because its name and scope do not both match.
To use one of these keys with the Memory Hub code, the owner opens the ⋯ menu of its row and chooses Add to Memory Hub. The dialog proposes a name from the key, keeps the key as the variable and locks the scope to where the values are already stored. Add a description, then click Add variable. The key moves to the catalog, already ticked and ready to be loaded. The menu is not offered when the same name is already defined at another scope.
Generate code for your authoring tool
Section titled “Generate code for your authoring tool”The Memory Hub generates two kinds of JavaScript. Neither belongs to a slide, and neither calls the AI.
| Button | What the code does | Use it for |
|---|---|---|
| Save to memory | Reads authoring tool variables and saves them to the learner’s memory. | Saving values from a screen that has no SlideMind slide. |
| Load into authoring tool | Reads values from the learner’s memory and writes them into authoring tool variables. | Showing a saved value on screen, or branching on it, in Storyline or another tool. |
- In the catalog, tick the variables, or tick the box in the header row to select them all. A bar appears below the catalog with the number of variables selected.
- In that bar, click Save to memory or Load into authoring tool (Load into tool on a narrow screen). Clear empties the selection.
- Choose the Authoring tool: Articulate Storyline, Adobe Captivate, Lectora, dominKnow | ONE or iSpring Suite.
- Under Memory → authoring-tool mapping, type the authoring tool variable for each memory variable. SlideMind proposes a name, for example
FirstNameforfirst_name. - Click Copy code.
- In your authoring tool, create the variables with exactly the same names, then run the code in a JavaScript trigger or action. In Storyline, use an Execute JavaScript trigger.
- Publish the course and test it launched from your LMS.
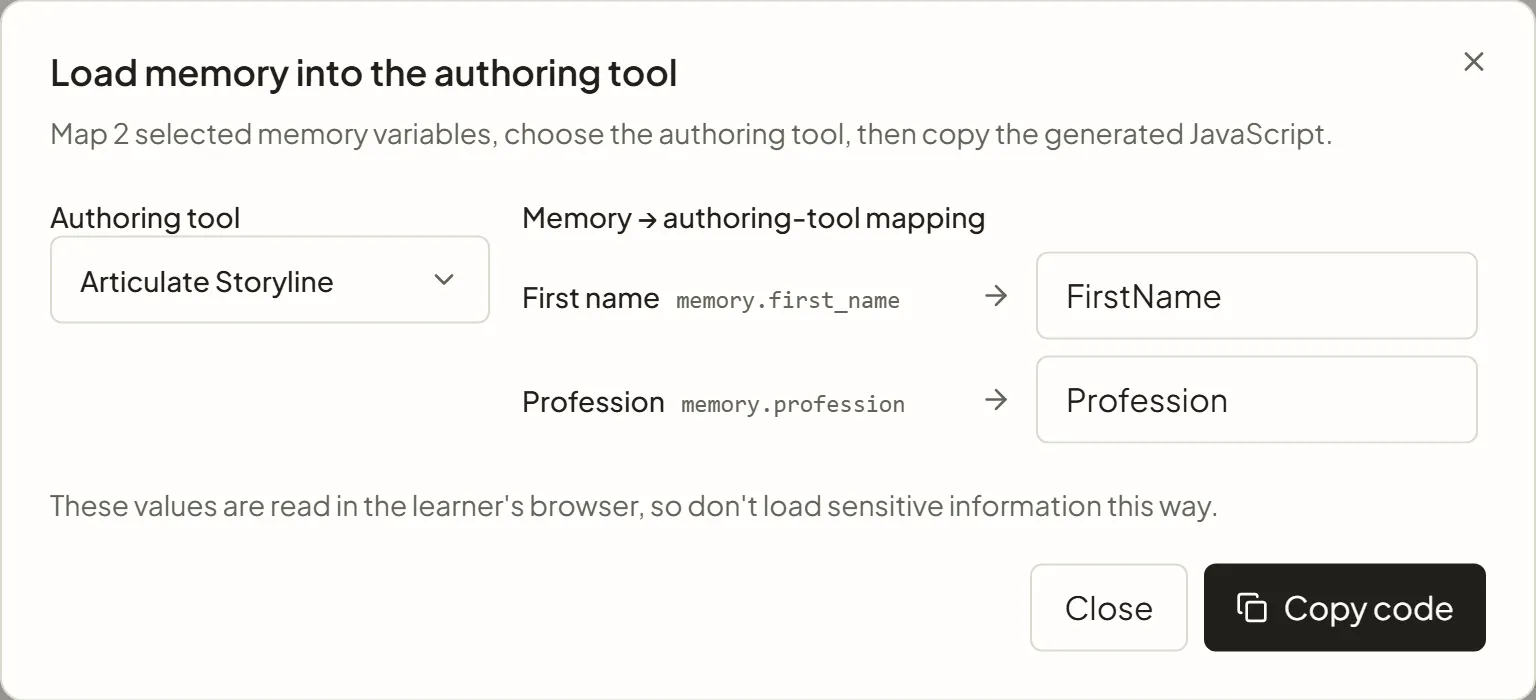
The code needs an identified learner: without one, it stops and saves or loads nothing. When the learner has no value for a variable, the load code leaves that authoring tool variable unchanged.
The memory bridge
Section titled “The memory bridge”The Memory Hub code uses a single connection for the whole workspace, called the standalone memory bridge. The first time a workspace owner opens one of the two code dialogs, SlideMind prepares it automatically (“Preparing the standalone memory bridge before generating code…”), and Activity records Memory bridge generated.
Until an owner has done this once, an Editor sees: “A workspace owner must generate the standalone memory bridge before this code is available.” Ask the workspace owner to tick a variable and open Save to memory or Load into authoring tool once.
Rules for the Memory Hub code
Section titled “Rules for the Memory Hub code”- Global scope. The Save to memory code saves every value at the Global scope. The Load into authoring tool code reads only variables defined with the global scope: if one selected variable has another scope, the whole load is refused. Use Global variables with this code.
- Defined variables only. Both codes accept only names defined in the catalog. A name that is not in the catalog is refused.
- Allowed websites. The load code works only when Settings › Integrations › Allowed origins lists the site that hosts your course. An empty list, or the 24-hour CORS test mode, is not enough for loading. See Allowed websites.
- Changes. The code contains the variable names and the authoring tool variables you mapped. After a change, generate and copy the code again.
Next steps
Section titled “Next steps”- Saving values: save values from Capture, Q&A and Chat slides.
- Using values in prompts: use the variables in your instructions.
- Learner data: check the values stored for each learner.
- Identifying learners: make sure SlideMind recognizes your learners.